Showing posts with label chocolate. Show all posts

Sunday, 9 August 2009

Chocolate Cupcakes

photo courtesy of sifu renka
I've had a lot of requests over the past month for chocolate cupcakes. I don't know what sparked it, but I was a little surprised to realize that I hadn't yet posted my recipe for chocolate cupcakes. These cupcakes are so easy to make and so delicious. These are chocolate cupcakes for the chocolate lover! When it comes to classic cupcakes, simple is better and that's what I'm doing here. These can be paired with vanilla, cream cheese frosting, buttercream, or chocolate frosting (but only if you really really like chocolate).
Chocolate cupcakes are great for holidays such as Halloween, Valentine's Day, and the fourth of July. They go great with any decoration, such as sprinkles and chocolate cupcakes look amazing with any white icing.

My mouth is watering already!

Chocolate Cupcakes for the Chocolate Lover

Makes about a dozen treats!


3/4 Cups unsweetened dutch process cocoa powder (or regular cocoa powder)
3/4 Cups hot water
3 Cups all purpose flower
1 tsp baking soda
1 heaping tsp baking powder
3/4 tsp salt
3 sticks unsalted butter
2 1/4 cups sugar
4 large eggs
A generous splash of vanilla extract
1 cup sour cream

Preheat your over to 350 degrees. Beat together cocoa and hot water until smooth. In a separate bowl, mix together flour, baking soda and powder, and salt until well combined.
Melt butter and sugar together in a saucepan over low-medium heat until smooth. Once smooth, transfer to mixing bowl and beat on medium speed until smooth. Add eggs, one at a time. Add cocoa and mix. Add vanilla and mix well. On low speed, beat in the flour mixture. Don't over mix! Now pour cupcakes into the cupcake tins and pop your chocolate cupcakes in the oven. Bake for around 20 minutes, rotating pan at the halfway mark.

You can store your chocolate cupcakes for up to 2 days, or in the freezer for up to two months but they taste so delicious when they're fresh. Frost them with chocolate, buttercream, or cream cheese frosting for an extra tang! Sometimes I like to top them with just some powdered sugar. These chocolate cupcakes are very rich and frosting might be too much for them. If you want a lighter frosting, go with boiled. This also tops chocolate cupcakes off great, but my favorite is the cream cheese.

Adding a little red and yellow food dye to the icing and topping it on these chocolate cupcakes makes for great Halloween cupcakes and with Halloween right around the corner, who can resist? Top with candy corn or orange and chocolate and white sprinkles.

Chocolate cupcakes are just another recipe from my collection. The cupcake are delicious, and you will no doubt enjoy eating them just as much (probably more) than making them. This chocolate cupcake recipe should hold you over till next time. Thanks for reading!

Saturday, 18 July 2009

Homemade Chocolate Frosting


photo credit: Frances Berriman

Cupcake frosting comes in many different flavors but the staples remain vanilla and chocolate. Vanilla buttercream is probably the king of all frosting, but in a close second is chocolate frosting and there's nothing to wet the palate quite like a big bowl of homemade chocolate frosting. Chocolate frosting tops off any cupcake and tastes especially good atop vanilla cupcakes. Decorating chocolate frosting can also be a lot of fun. Generally I use muted and pastel sprinkles with white frosting, but with homemade chocolate frosting I like to use brighter colors: bright blues, yellows, purples, and pinks look especially nice.
Here's a great and easy recipe from my personal collection for homemade chocolate frosting.

Makes enough for around 30 cupcakes.

2 cups (4 sticks) unsalted butter
14 oz semisweet chocolate, melted and cooled
2.5 TBSP milk
2 tsp vanilla extract
5 cups confectioners sugar

Beat butter until smooth. Add chocolate until combined. Add the milk, vanilla extract, and confectioners sugar and beat until combined on medium speed. Don't over mix!

That recipe should suit your craving for chocolate. It's very rich yet somehow always comes out just right. You can store the homemade chocolate frosting in a sealed container overnight and in a refrigerator for up to a few days. Let it sit until it's room temperature if you're going to store your homemade chocolate frosting in the refrigerator. Sometimes the chocolate frosting will dry out and if that's the case don't be afraid to add some milk and then beat until smooth and creamy. But be careful not to add too much milk, a little milk goes a long way and it's better to have to add more than to add too much.

Another thing to be aware of with homemade chocolate frosting is that it creates an outer shell very quickly. Generally when I make cupcakes with vanilla frosting I frost 24 at a time and then decorate with sprinkles or whatever else I might be using. I've found that anymore than 24 at a time and the frosting forms a thin hard shell on the outside and it loses it's stickiness making it more difficult to decorate. Chocolate frosting forms a shell even quicker and will lose it's stickiness soon after frosting the cupcakes. Of course it depends on how long it takes you to frost the cupcakes, but I usually decorate after 6, sometimes after 12 but 6 to be safe. Chocolate frosting forms a shell quicker because it has chocolate in it which is dryer than butter, which is the main ingredient in vanilla buttercream frosting.

If you want to add a little pizazz to your homemade chocolate frosting, I will suggest a few ways to go about it. You can always add chocolate chips. I find that mini chocolate chips work better than regular ones. You can also make a chocolate frosting swirl. This is simple, all you do is make two separate batches of frosting - one with darker chocolate and one with lighter. Depending on how you frost your cupcakes, the method of making a frosting swirl will differ. The way I do it is with a flat and long metal spatula. I first tap on one chocolate frosting and then in the center I tap on the other chocolate frosting. I then gently press down with the tip of the spatula and flick my wrist a make a swirl! It definitely takes some practice and getting used to, but once you figure it out you'll be making chocolate frosting swirls before I can say "I love cupcakes!".

One last idea for a twist on homemade chocolate frosting before we wrap up. This one is for all you people out there who like chocolate frosting but who also like white frosting (that's me!) Try substituting the chocolate for white chocolate. That way you'll have excellent white chocolate frosting that will pleasantly surprise anyone who takes a bight out of it. You can even make a chocolate frosting and white chocolate frosting swirl.

Enjoy your homemade chocolate frosting and come back for more great cupcake recipes!

Tuesday, 10 February 2009

Red Velvet Cupcake Recipe


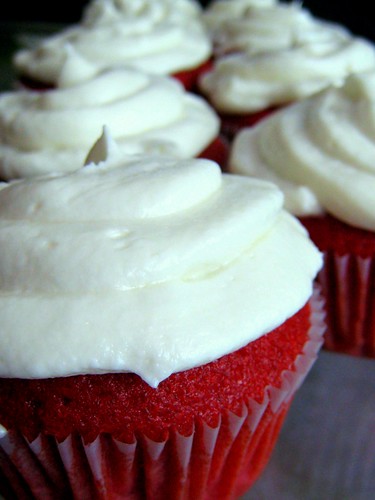
photo courtesy of emmyboop

I think by far one of the most popular cupcakes are Red Velvet Cupcakes.

Red Velvet Cupcakes are by far my favorite kind of cupcake. And I will share with you the best recipe I know of.

First some background. What are "red velvet" cupc
akes?

Red Velvet Cupcakes are rich chocolate cupcakes. They are called red velvet due to their distinctive rich red color. Originally, cocoa used to be a lighter shade and what gave red velvet cupcakes their unique color was a chemical reaction of unprocessed cocoa with the acid in the buttermilk. You can still buy this type of cocoa, however now more often then not it is red food coloring that makes the cupcakes red. I prefer to use the lighter cocoa for my red velvet cupcakes because food coloring is bad for you and the less chemicals we put in our bodies, the better. One thing's for sure, if your serious about baking you should know a little bit about health and food.

Red velvet cupcakes traditionally come wit
h boiled frosting which happens to be my favorite kind of frosting. However, nowadays red velvet cupcake recipe usually calls for cream cheese frosting.

The red velvet cupcake recipe I am going to give
you will allow you the opportunity to add either cream cheese, boiled frosting, or any other white frosting you desire. With this red velvet cupcake recipe, any white frosting will do.


2 1/2 cups sifted cake flour
1 teaspoon baking powder
1 teaspoon salt
2 tablespoons unsweetened cocoa powder
2 oz. red food coloring (two bottles) or 4 oz beet juice (if you use unprocessed light cocoa you can leave out the food dyes and you'll get a warm red/brown color)
1/2 cup unsalted butter, softened
1 1/2 cups sugar
2 eggs, at room temperature
1 teaspoon vanilla extract
1 cup buttermilk, at room temperature
1 teaspoon white vinegar
1 teaspoon baking soda

1. Preheat oven to 350 degrees. Line two 12-cup muffin tins or silicone pans with cupcake liners.

2. Sift together the cake flour, baking powder, and salt into a medium bowl and set aside. In a smaller bowl, mix food coloring and cocoa powder to form a thin paste without lumps and set aside.

3. In a large bowl, using a hand mixer or stand mixer, beat butter and sugar together until light and fluffy, about three minutes. Beat in eggs, one at a time, then beat in vanilla and the red cocoa paste, scraping down the bowl with a spatula as you go. Add one third of the flour mixture to the butter mixture, beat well, then beat in half of the buttermilk. Beat in another third of flour mixture, then second half of buttermilk. End with the last third of the flour mixture, beat until well combined, making sure to scrape down the bowl with a spatula.

4. In a small bowl, mix vinegar and baking soda. Be careful as it will fizz so don't do it in a shallow bowl. Add vinegar mixture to the cake batter and stir well to combine. Fill cupcake cups with cake batter until they are a little under 3/4 full. I ended up with 20 cupcakes. Place muffin tins in your preheated oven. Bake for approximately 20, rotating pans halfway through. The cupcakes are done when you are able to pat the tops and the cake springs back up. If it sinks down they are not yet complete. Or you can insert a toothpick into the center of a cupcake in the center of the tin and if it comes out clean they are done!

5. Cool the cupcakes in their tins on a wire rack for 10 minutes then remove and allow to cool completely before frosting.

6. Enjoy!


The reason why I love red velvet cupcakes so much is because of their rich and deep flavor. They aren't too sweet and they taste the way they look - like red velvet cupcakes!

There are many red velvet cupcake recipes floating around, but the one that I gave to you should really be excellent. It's the cream of the red velvet cupcake recipe crop! I promise as long as you follow the directions properly, and remember what I have taught you, your red velvet cupcakes should come out exactly as you imagine.

You could decorate them with little pink and whit hearts, sprinkles, or anything else your hearth desires.

Good luck with the red velvet cupcake recipe! I hope your red velvet cupcakes come out perfect!