Tuesday 24 February 2009

Cupcake Decorating

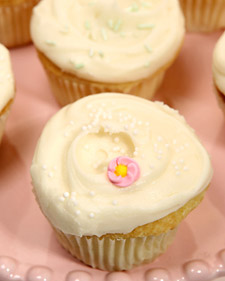
photo credit: www.marthastewart.com

Decorating cupcakes is just as important as baking the cupcakes. Studies prove that the way food looks effects how people perceive the taste and the entire experience all together, so decorating cupcakes should be a priority. Depending on the occasion you're baking for, your cupcakes should be decorated differently. Holidays are fun because you get to choose a them and decorate cupcakes based on that theme. For example, Halloween calls for orange and chocolate frostings, orange black and white sprinkles, and a spooky theme. Or if your cupcakes are for July 4th, you could decorate them in red, whites and blues and have a patriotic theme.

Decorating for special occasions, like a wedding or baby shower will usually call for more subtle and pretty colors and cupcake decorations. You should use white, pink, and lavender or baby blue and lots of white and pink sprinkles. The keyword here is pastels!

If your cupcakes are just for fun or a birthday, don't be afraid to go a little crazy. Use a lot of different colors of frosting, icing, sprinkles and much more. The crazier they are, the more people will love them so don't be afraid to over decorate your cupcakes.

The main tools needed for decorating cupcakes are firstly a tool for frosting your cupcakes. For this you can use either a pastry bag with assorted tips, or my personal favorite, a long, flat narrow spatula. Now for decorating cupcakes you will need sprinkles, sparkles, sugar treats, candies, etc. You could pretty much use anything your heart desires. Take a trip to your local baking supplies store and go to the decorating cupcakes aisle. You could even pick out some fun cupcake wrappers.

I'll be talking in the future about specific cupcake decorating ideas, but for now I just want you to remember that in this case, looks are important. Decorating cupcakes matters!

Tuesday 10 February 2009

Banana Cupcakes

Photo Credit: http://www.flickr.com/photos/santos/132324775

Banana Cupcakes are delicious. Though not the most traditional cupcake, the banana cupcake is one of my favorites and a definite crowd please. It's easy to use a banana bread recipe to make your banana cupcakes but I warn you they'll turn out more like muffins. Muffins are bread-ier than banana cupcakes should be. A good banana cupcake should be light and fluffy.

Many people enjoy their banana cupcakes with cream cheese frosting and I agree. But if you don't like cream cheese frosting, enjoy your banana cupcakes with regular buttercream, or boiled frosting. They even taste good with chocolate frosting! If you add a splash of honey to a frosting they taste amazing.

As for the best banana cupcake recipe I could find. Well I searched high and low for a moist and delicious, light and fluffy banana cupcake recipe and I found the banana cupcakes of your dreams right here. These are made with an excellent honey- cinnamon frosting. A real treat!

Or if you have a good banana cake recipe, I would suggest you even use that! Banana cupcakes and banana cake are exactly the same, (just the banana cupcakes are a bit smaller!). Banana cupcakes look great next to red velvet cupcakes. A sure crowd pleaser is red velvet cupcakes with boiled frosting and banana cupcakes with cream cheese frosting. It's something for everyone and no one will walk away unhappy.

Enjoy your banana cupcakes!

Boiled Frosting

Boiled Frosting

Here is my recipe for boiled frosting. You might be wondering - what is boiled frosting? Well, I'll tell you then. Boiled frosting, aside from being my favorite kind of frosting, is a delicate and subtle delicious frosting, generally with a little vanilla flavoring. Boiled vanilla frosting is most commonly used on red velvet cakes and red velvet cupcakes, though it tastes great on all kinds of cupcakes!

It's called boiled frosting because part of the process of making it calls for you to boil some of the ingredients - hence we get "boiled frosting". It's really delicious and is a great alternative for when you get bored of buttercream frosting, or other really heavy frosting. Boiled frosting wins in my book!

It's easy to make and I'll tell you how to do it:

1 1/2 Cups sugar divided leaving 2 TBSP aside
3/4 Cup of cold water
1 TBSP of corn syrup
2 egg whites
1/8 tsp salt
a splash of vanilla extract

Combine sugar (all but 2 TBSP), water, and corn syrup into a saucepan with a heavy bottom. Stir while cooking over medium heat until your sugar is dissolved. At this point it should look clear. Continue to let it cook until it becomes syrupy. Make sure you don't burn it or your boiled frosting won't turn out so keep an eye on it.
While it's cooking beat your egg whites till the form stiff peeks. Add the remaining sugar and beat. Add syrup while mixing until thoroughly blended. Add vanilla and continue to mix until it begins to form small peaks.

Viola! You have just made yourself some boiled frosting. Let it cool if it's too hot before frosting your cupcakes. Boiled frosting tends to melt if you leave it in the sun (you shouldn't be leaving your cupcakes in the sun anyway) but make sure you don't leave a bowl of boiled frosting in the sun because it will get ruined.

If you don't like boiled frosting, cream cheese frosting is also used on red velvet cupcakes. Use whichever you prefer! I prefer boiled frosting, but I know a lot of people who don't like it as much.

Good luck with your boiled frosting!

Red Velvet Cupcake Recipe


photo courtesy of emmyboop

I think by far one of the most popular cupcakes are Red Velvet Cupcakes.

Red Velvet Cupcakes are by far my favorite kind of cupcake. And I will share with you the best recipe I know of.

First some background. What are "red velvet" cupc
akes?

Red Velvet Cupcakes are rich chocolate cupcakes. They are called red velvet due to their distinctive rich red color. Originally, cocoa used to be a lighter shade and what gave red velvet cupcakes their unique color was a chemical reaction of unprocessed cocoa with the acid in the buttermilk. You can still buy this type of cocoa, however now more often then not it is red food coloring that makes the cupcakes red. I prefer to use the lighter cocoa for my red velvet cupcakes because food coloring is bad for you and the less chemicals we put in our bodies, the better. One thing's for sure, if your serious about baking you should know a little bit about health and food.

Red velvet cupcakes traditionally come wit
h boiled frosting which happens to be my favorite kind of frosting. However, nowadays red velvet cupcake recipe usually calls for cream cheese frosting.

The red velvet cupcake recipe I am going to give
you will allow you the opportunity to add either cream cheese, boiled frosting, or any other white frosting you desire. With this red velvet cupcake recipe, any white frosting will do.


2 1/2 cups sifted cake flour
1 teaspoon baking powder
1 teaspoon salt
2 tablespoons unsweetened cocoa powder
2 oz. red food coloring (two bottles) or 4 oz beet juice (if you use unprocessed light cocoa you can leave out the food dyes and you'll get a warm red/brown color)
1/2 cup unsalted butter, softened
1 1/2 cups sugar
2 eggs, at room temperature
1 teaspoon vanilla extract
1 cup buttermilk, at room temperature
1 teaspoon white vinegar
1 teaspoon baking soda

1. Preheat oven to 350 degrees. Line two 12-cup muffin tins or silicone pans with cupcake liners.

2. Sift together the cake flour, baking powder, and salt into a medium bowl and set aside. In a smaller bowl, mix food coloring and cocoa powder to form a thin paste without lumps and set aside.

3. In a large bowl, using a hand mixer or stand mixer, beat butter and sugar together until light and fluffy, about three minutes. Beat in eggs, one at a time, then beat in vanilla and the red cocoa paste, scraping down the bowl with a spatula as you go. Add one third of the flour mixture to the butter mixture, beat well, then beat in half of the buttermilk. Beat in another third of flour mixture, then second half of buttermilk. End with the last third of the flour mixture, beat until well combined, making sure to scrape down the bowl with a spatula.

4. In a small bowl, mix vinegar and baking soda. Be careful as it will fizz so don't do it in a shallow bowl. Add vinegar mixture to the cake batter and stir well to combine. Fill cupcake cups with cake batter until they are a little under 3/4 full. I ended up with 20 cupcakes. Place muffin tins in your preheated oven. Bake for approximately 20, rotating pans halfway through. The cupcakes are done when you are able to pat the tops and the cake springs back up. If it sinks down they are not yet complete. Or you can insert a toothpick into the center of a cupcake in the center of the tin and if it comes out clean they are done!

5. Cool the cupcakes in their tins on a wire rack for 10 minutes then remove and allow to cool completely before frosting.

6. Enjoy!


The reason why I love red velvet cupcakes so much is because of their rich and deep flavor. They aren't too sweet and they taste the way they look - like red velvet cupcakes!

There are many red velvet cupcake recipes floating around, but the one that I gave to you should really be excellent. It's the cream of the red velvet cupcake recipe crop! I promise as long as you follow the directions properly, and remember what I have taught you, your red velvet cupcakes should come out exactly as you imagine.

You could decorate them with little pink and whit hearts, sprinkles, or anything else your hearth desires.

Good luck with the red velvet cupcake recipe! I hope your red velvet cupcakes come out perfect!


Monday 9 February 2009

Cupcake Pans and Other Cupcake Tools

photo credit: www.hankuan.com.tw


We are almost ready to start making cupcakes. But first, I want to talk a little about the non-ingredients of cupcake recipes. Cupcake pans and other tools you will need to start making your perfect cupcakes.

Cupcake pans are more commonly referred to as muffin pans, so if you have your muffin pan, don't worry it's the same thing!
There are 2 main different kinds of cupcake pans. There is aluminum cupcake pan and then there is the increasingly popular silicone pan (silicone muffin pan).

The silicone cupcake pan is becoming more and more popular since it makes cupcake clean up easier and it's also easier to get cupcakes out of a silicone cupcake pan than it is an aluminum one. I still use aluminum. I've been in the cupcake baking business for decades and I like tradition. But I would recommend, especially if you're not quite a seasoned baker yet, the silicone cupcake pan as it will be easier for you to use and create less fuss. Both aluminum and silicone cupcake pans come in an array of shapes, sizes, colors and amounts. You can get a silicone cupcake tray for up to 36 cupcakes. I think the smallest amount is 6, but and generally increases from there in increments of three. Silicone cupcake trays come most commonly in red and blue, but I've seen them on occasion in pink and purple and yellow. Colored kitchen tools are just more fun to use! I myself prefer using pink kitchen gadgets.
You can get mini silicone cupcake pans or regular size silicone cupcake pans. The same goes for aluminum cupcake pans. If you are using the aluminum variety, make sure you use a generous amount of non stick spray or butter (I prefer butter but non stick spray is healthier). You can also use a little non stick for silicone cupcake pans. It won't hurt! It will only make things that much easier.
Silicone cupcake pans also come in a variety of shapes. The most standard - the cupcake shape (or muffin shape). I've also seen silicone cupcake pans in the shape of hearts, pumpkins, stars and a few other things. If you're desperate for a specific shape and you can't find a silicone cupcake pan in that shape, you can always custom order it!

Now that you have your silicone cupcake tray ready to go, here are a few other things that you will need to complete your cupcake recipe.

You will need two mixing bowls. One for wet and one for dry. You will need a mixer (handheld electric will do). Measuring cups and a pyrex (a glass measuring cup). Measuring spoons. A clean workspace. Clean hands.

To make the cupcake frosting you will need:
Mixing Bowl. A standup mixer is preferable for the frosting but if you don't have one a handheld will do just fine.
A long flat metal spatula to mix the frosting and to frost the cupcakes! That's it!
I will have a whole section of frosting cupcakes which is also something that you need to practice to get right.

No you're ready to make your cupcakes! Take out that silicone cupcake pan and get ready!

Cupcake Ingredients for Cupcake Recipes

Cupcake recipes make baking cupcakes as easy as 1 - 2 - 3! You don't have to know how to cook to bake cupcakes. Cupcake recipes make it easy and for everyone. But before we begin baking the most scrumptious cupcakes we need to review some general rules about baking cupcakes.
Like anything, your first attempt at baking cupcakes won't be perfect. It's an art and it takes time to perfect that art. The more you practice, the nicer your cupcakes will be!
You need three main things before you start baking your first batch of cupcakes:
1- A killer cupcake recipe (which I will be providing for you so you can check that off the list!)
2- The right set of tools and some knowledge of how the cupcake ingredients work.
3- A lot of cupcake love.

If you can check all of those things off your list, then you are ready to start making cupcakes.

If you can't check off number 2, then you are in the right place because I will explain to you the ins, the outs, the goods and the uglies of baking cupcakes.

First of all, cupcake ingredients: flour, milk, eggs, butter (I use salted but if you want to add the salt separately be my guest and use unsalted) baking powder, sugar, vanilla extract.
These ingredients are the basics of what you will need to make cupcakes. Most of these cupcake ingredients are pretty straightforward, but I'm going to explain a few things about a few of these ingredients to you.
First I'm going to separate into dry cupcake ingredients and wet cupcake ingredients. This isn't as straightforward as you may think.

Dry Cupcake Ingredients: Wet Cupcake Ingredients:
Flour Milk
Baking Powder Eggs
Butter Vanilla Extract
Sugar

You might be wondering why butter falls into the category of dry cupcake ingredients and why sugar is wet. Just accept it. In the baking world, that's how we do it. Okay, if you demand an explanation, here it is. Butter, unless melted, would be very difficult to combine with dry ingredients if it is already in with wet ingredients. So we add it to the dry cupcake ingredients first to create a sort of crumble-like texture which makes it easier to add the wet ingredients to after. To understand why sugar is a wet cupcake ingredient, first I will explain baking powder and it's properties. Baking powder is a leavening agent, which means it makes things rise. (so we don't have flattened cupcakes!) The baking powder becomes activated when it becomes wet. Baking powder makes flour rise. Sugar does not rise. For example, if you put together sugar and baking powder and added some milk, nothing would rise. When you add sugar to dry ingredients, it doesn't always distribute itself evenly. But to wet ingredients you have a better chance at having evenly distributed sugar in your cupcakes! This is due to the texture of the sugar.
Something very important about adding dry cupcake ingredients and wet cupcake ingredients - You want to add the wet to the dry and you don't want to do it all at once. The way it works is as soon as the leavening (the baking powder) gets wet, it is activated. From there the clock begins to tick. You don't want to over agitate your cupcake ingredients after you add the wet to the dry because if you overmix your cupcakes will not rise properly. The goal is to mix just enough, not too much or too little. It might take a few tries to get right, but this is very important. It's what separates the bad cupcakes from the good cupcakes. We want to treat our cupcake ingredients with respect because cupcake ingredients do not grow on trees!

I believe you now should have a good understanding of cupcake ingredients and how they work. You are almost ready to begin using your cupcake ingredients. Before I will talk about tools you need for cupcake recipes!

Cupcake Recipes


image courtesy of clever cupcakes


For years and years I tried to find the best cupcakes in all the world. Ambitious, yes, but wholly worth my time. I've loved cupcakes since I was a little girl. It came as no surprise to anyone that when I grew up I became a baker - a cupcake baker. Yes, it is true. I work in a cupcake bakery. I won't mention it's name, but it's definitely got a reputation and competes for the title of best cupcakes in New York City. I'm not here to spill the bakeries secrets (okay, maybe a few), I'm here to spill my own cupcake secrets. Over the years I have perfected the art of baking cupcakes. Chocolate, vanilla, red velvet cupcakes. The list goes on. Frostings from butter, chocolate, cream cheese, to boiled vanilla. This is the resource for all you cupcake needs. You won't be left in the dark. Every week I will give you at least one cupcake recipe, maybe more. If you have any requests for any kind of cupcake just go ahead and ask! If you aren't a fan of my cupcake recipes, there are other places that have excellent cupcake recipes. Ivillage has excellent recipes, as does nibbledish. Good luck!

You will find the best cupcake recipes here, coming from someone who has dedicated her life to those mini cakes me all love so much!